DIY Shrinky Dink Agate Slice/Geode Coaster!
- Megan Weller

- Mar 22, 2020
- 2 min read
Hey guys, it's Megan!
I recently made a video showing you 10 Craft Supplies You NEED to try, and one of those supplies is Shrinky Dinks.
In the video, I showed how to make these Geode/Agate Slice Coasters. If you'd like to see the video tutorial, click here.
Otherwise, let's jump into it!
*Some of the links below are affiliate links, meaning I may earn a small commission if you purchase something through my link. See my disclosure for more information.*
For this project you'll need:
*Shrinky Dinks Rough and Ready Shrink Plastic
*Ohuhu Alcohol Based Markers (any alcohol based markers will work)
*Geode outline template
*Mod Podge Dimensional Magic (optional)
*Masking Tape (optional)
First, print out or draw an agate slice outline to trace. I just googled "geode drawing", and came across this image.
Take your Shrinky Dink plastic, and place it on top of your printout with the shiny side up. You can use a bit of masking tape to hold it in place.

Next, use Posca Pens to trace the outline of your geode.
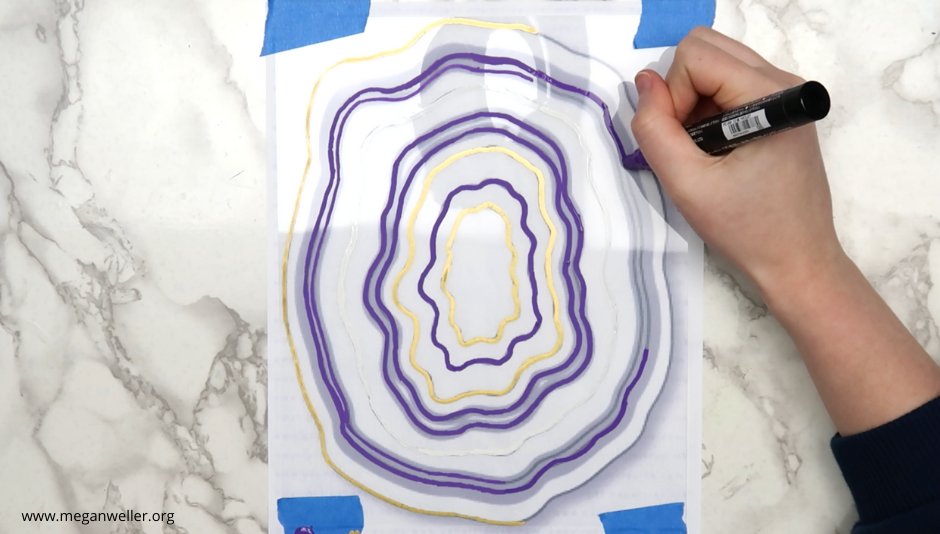
I used a purple, gold, and white Posca pen.
After you've traced everything, remove the tape and flip your Shrinky Dink plastic over so the rough side is facing up.

Tape the plastic sheet back down, and fill in your geode with alcohol based markers.

I used my Ohuhu 120 Brush marker set in the colors P3 (pastel violet), P4 (lavender), P5 (Aubergine), and R11(Mauve Shadow).
Keep in mind that the colors you use will be slightly darker when baked.
When you're finished coloring, cut out your geode shape:

Put it on a baking tray covered with parchment paper, and bake it according to the package instructions. (Mine said to bake about 3 minutes at 325 degrees.)

I'm sure most of you have worked with Shrinky Dinks before, but if you haven't: don't panic when/if the plastic starts to curl up. It will flatten out when it's done shrinking. If it doesn't for some reason, you can always flatten it with a heavy book when you remove it from the oven.
When my finished piece cooled, I colored the edges with my gold Posca Pen, and sealed the top (the shiny side) with a layer of Mod Podge Dimensional Magic.

If you don't have Mod Podge Dimensional Magic, you could used any other sealant you'd like (uv resin, polyurethane, Mod Podge, etc.)
Once everything dries, your geode coaster is ready to go!

If you're not a huge "coaster person", you could also use this technique to make wall art.
I just picked up a frame from the Dollar Tree (4 x 6 inches), put a piece of card stock paper where the picture is supposed to go, and stuck the geode to the glass part with some Blue Tack (you could also use hot glue, E6000 glue, etc.)

And that's all there is to it! This is the perfect rainy day activity to do when you're stuck at home 😉 Hope everyone is doing well! 💜


rajaberas88 | rajaberas88 | rajaberas88 | rajaberas88 | rajaberas88 | rajaberas88 | rajaberas88 | rajaberas88 | rajaberas88 | rajaberas88 | rajaberas88 | rajaberas88 | rajaberas88 | rajaberas88 |
raja beras88 | raja beras88 | raja beras88 | raja beras88 | raja beras88 | raja beras88 | raja beras88 | raja beras88 | raja beras88 | raja beras88 | raja beras88 | raja beras88 | raja beras88 | raja beras88 |
rajaberas88 | rajaberas88 | rajaberas88 | rajaberas88 | rajaberas88 | rajaberas88 | rajaberas88 | rajaberas88 | rajaberas88 | rajaberas88 | rajaberas88 | rajaberas88 | rajaberas88 | rajaberas88 |
raja beras88 | raja beras88 | raja beras88 | raja beras88 | raja beras88 | raja beras88 | raja beras88 | raja beras88 | raja beras88 | raja beras88 | raja beras88 |…
Odd date positions make for great watches…The Omega DeVille chronograph is a piece link that I’ve had on my link watch list for some time now, but it was link always in the periphery because I never wished to get my hopes up in finding one.
As it stands, we're link running at a deficit of about .5 milliseconds a day. If this continues, and the earth's rotation speeds up, it might be necessary to add a "negative leap second" every year to compensate for this, but of course, that comes with its own set of problems. Even though a single second wouldn't be perceived by you and me, to software, a link change this link minor can have massive ramifications. The New York Post highlighted this phenomenon affecting popular websites:
Follow-up experiments proved that it was indeed possible for a human to breathe perfluorocarbon, a synthetic liquid that holds three times the amount of oxygen as human blood. This is the real-life technology behind the scene link in The Abyss when Ed Harris puts on a liquid-filled link dive suit in order to dive deep into link the Mariana Trench without succumbing to the fatal effects of pressure at that depth.
Data Cambodia
Bocoran Sdy
Bocoran Sgp
Bocoran Hk
Syair Sdy
Syair Sgp
Syair Hk
Freebet Gratis
Freebet
Erek Erek
Cara Curang
Cara Menang
Bocoran Sdy
Bocoran Sgp