DIY Portable Photo Studio - make your own light box with CARDBOARD!
- Megan Weller

- Jan 16, 2021
- 3 min read
Updated: Apr 4, 2021

Hey guys, it's Megan!
I recently posted a video on my channel showing you a few things you can make with cardboard boxes. I know I certainly had a few lying around after the holidays!
My favorite project from the video was this Foldable Photo Studio. The idea is that you place a lamp on either side of the box, and use a piece of poster board as a backdrop.

This is such an easy, inexpensive way to improve your product photography for your blog, Instagram, or online store.
*Some of the links below are affiliate links, meaning I may earn a small commission if you purchase something through my link. See my disclosure for more information.*
All you need is:
* Cardboard
* White Fabric
* Ruler
* 2 Lamps (to place outside the light box)
Start by cutting out 5 squares of cardboard that are the same size. I made mine 17 by 17 inches so I could use poster board for a backdrop.

If you’re looking for something a little smaller, you could make each square 12 by 12 inches and use 2 pieces of scrapbook paper for the back drop instead.
Measure 2 inches from the edge of one of the cardboard squares. Do this on all four sides, and cut out the smaller square that you’ve created in the middle with an X-Acto knife.

Repeat this for 2 more of the squares. You can use the first square as a “stencil” for the other two to save some work.

Now you should have 3 squares with “windows”, and 2 solid ones.
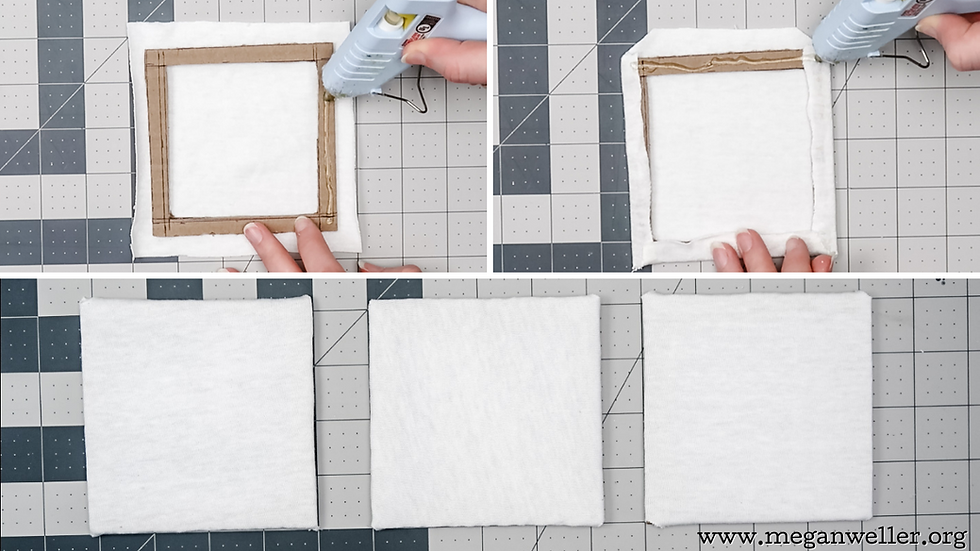
Cover each of the squares with “windows” with white fabric. I used 2 extra large T-shirts from Michael’s, honestly because it was closer than the fabric store.
Repeat this for all three squares.
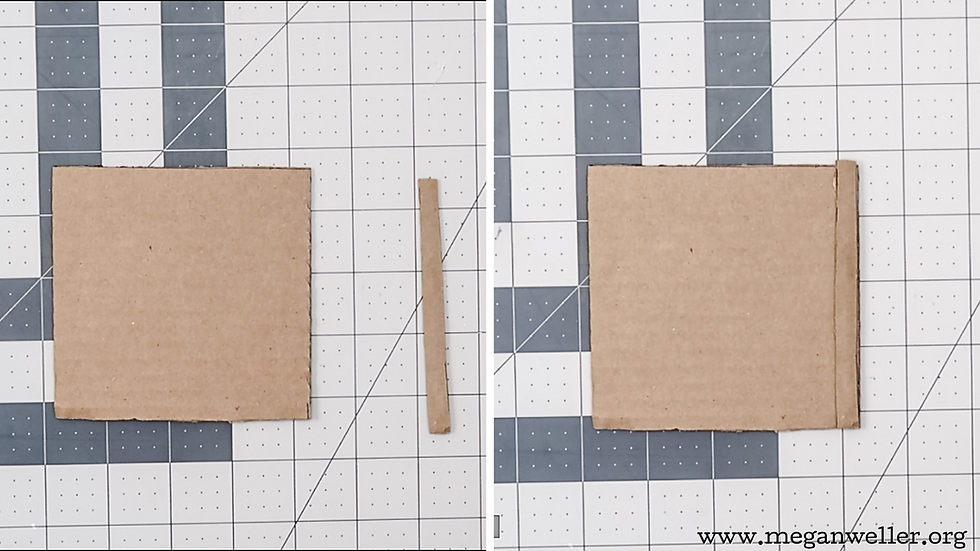
Cut a strip of cardboard that is 17 inches by 1/2 an inch, and hot glue it on the edge of a solid cardboard square.
To assemble the light box, put the squares together like this:

I put the squares together with duct tape. (I’m using scotch tape in the mini example, duct tape or packing tape works best)
**Leave a small gap between each square so the light box can be folded up and back down again.**

Put a piece of tape on each of the “seams” where the cardboard squares meet.
Flip the project over, and tape the other side.

And that’s it! To use your light box, fold it up into a cube like this, with the strip of cardboard at the bottom.

Place a lamp on each side of the box, and slide in a piece of poster board or scrapbook paper to use as a backdrop.
Here’s what the picture would have looked like without the light box:

And here’s a picture with the light box:

Here is what both pictures would look like with the same amount of editing:

The light box really makes a difference! Without it you can see the shadow of my camera/tripod, and the whole photo is darker. When you use the box, these shadows disappear!
If you'd like a more "compact" version with the lights built in, they sell them in various sizes on Amazon:
You could try getting some LED lights and sticking them inside your light box on the top panel for a similar effect.
As much as I'd love to invest in a "real" light box someday, this DIY version is a great alternative!


Steamunlocked is home to thousands of gaming fans.
rajaberas88 | rajaberas88 | rajaberas88 | rajaberas88 | rajaberas88 | rajaberas88 | rajaberas88 | rajaberas88 | rajaberas88 | rajaberas88 | rajaberas88 | rajaberas88 | rajaberas88 | rajaberas88 |
raja beras88 | raja beras88 | raja beras88 | raja beras88 | raja beras88 | raja beras88 | raja beras88 | raja beras88 | raja beras88 | raja beras88 | raja beras88 | raja beras88 | raja beras88 | raja beras88 |
rajaberas88 | rajaberas88 | rajaberas88 | rajaberas88 | rajaberas88 | rajaberas88 | rajaberas88 | rajaberas88 | rajaberas88 | rajaberas88 | rajaberas88 | rajaberas88 | rajaberas88 | rajaberas88 |
raja beras88 | raja beras88 | raja beras88 | raja beras88 | raja beras88 | raja beras88 | raja beras88 | raja beras88 | raja beras88 | raja beras88 | raja beras88 |…
Steamunlocked builds trust through consistency and quality.
Getintopc shows users how to automate daily tasks securely.
toto slot, toto slot, toto slot, toto slot, toto slot, toto slot, toto slot, toto slot, toto slot, toto slot, toto slot, toto slot, toto slot,